
Install Kismet Fixtures on WordPress
View .mdThis guide is for the web developer or agency that builds and hosts a vacation rental website for a manager who uses Kismet. You keep the theme, the host, and the content. Kismet adds search, results, property detail, calendars, reviews, and checkout, and connects them to the manager’s property management system.
Work on a staging copy of the site first. Every step below runs on staging, then repeats on production with a production key.
Before you start
Section titled “Before you start”You need:
- Administrator on the WordPress site, staging and production. Editor is not enough to install a plugin.
- WordPress 6.3 or newer and PHP 8.0 or newer.
- The manager’s Kismet collection slug. The manager finds it in the address of their collection in Kismet.
- Someone with an admin role on the collection in Kismet, to register domains and generate keys in step 2. That is usually the manager or a Kismet team member. If you have been added to the collection as an admin you can do it yourself.
The plugin is the same one running on live Kismet sites. It appears in WordPress as Kismet Fixtures; releases before the rename show Kismet Elements. The plugin slug is kismet-elements either way.
1. Get a staging copy
Section titled “1. Get a staging copy”Use your host’s staging environment. WP Engine, WordPress.com, SiteGround, and Kinsta each provide one from their panel. A staging copy must:
- serve on its own hostname, for example
staging.example.com, because keys are bound to a hostname in step 2; - carry the production theme and pages, so what you verify is what will ship;
- have any full-page cache and CDN cache purgeable by you, because you will purge after every change below.
2. Register domains and generate keys
Section titled “2. Register domains and generate keys”Keys are created in Kismet on the collection’s Keys page. This needs an admin role on the collection.
- Register both hostnames: the staging host and the production host, exactly as they will serve, for example
staging.example.comandwww.example.com. Keys are bound to a registered domain and requests from an unregistered origin are rejected. - Generate a publishable key for each domain. The full key, which starts with
kismet_epk_, is shown once. Copy it into a secret manager. One active key per domain; generate a new one and revoke the old one to rotate. - Reveal the tracking key on the same page, under Attribution keys. It starts with
ctk_and is one per collection, shared by staging and production. Treat it like a password: it is stored encrypted by the plugin and never shown again in WordPress after you save it.
Never put either key in a page, a theme file, or a commit. The publishable key goes into the plugin settings only.
3. Install the plugin
Section titled “3. Install the plugin”Download the current release from the stable link. It always redirects to the newest versioned zip, so the same link works for every release:
https://kismet.travel/api/wp-plugin/latestFrom wp-admin: Plugins, Add New, Upload Plugin, choose the zip, Install Now, then Activate.
With WP-CLI:
curl -L -o kismet-elements.zip https://kismet.travel/api/wp-plugin/latestwp plugin install kismet-elements.zip --activateThe current version number is in the update manifest at https://kismet.travel/api/wp-plugin/manifest, and on the settings screen after install.
The plugin checks Kismet for new releases about every twelve hours and offers updates through the normal WordPress plugin update screen. Keep auto-updates on, or agree an update cadence with the client. The settings screen has a Check for updates now button.
4. Configure the connection
Section titled “4. Configure the connection”Open Settings, Kismet Fixtures (Kismet Elements on older releases).
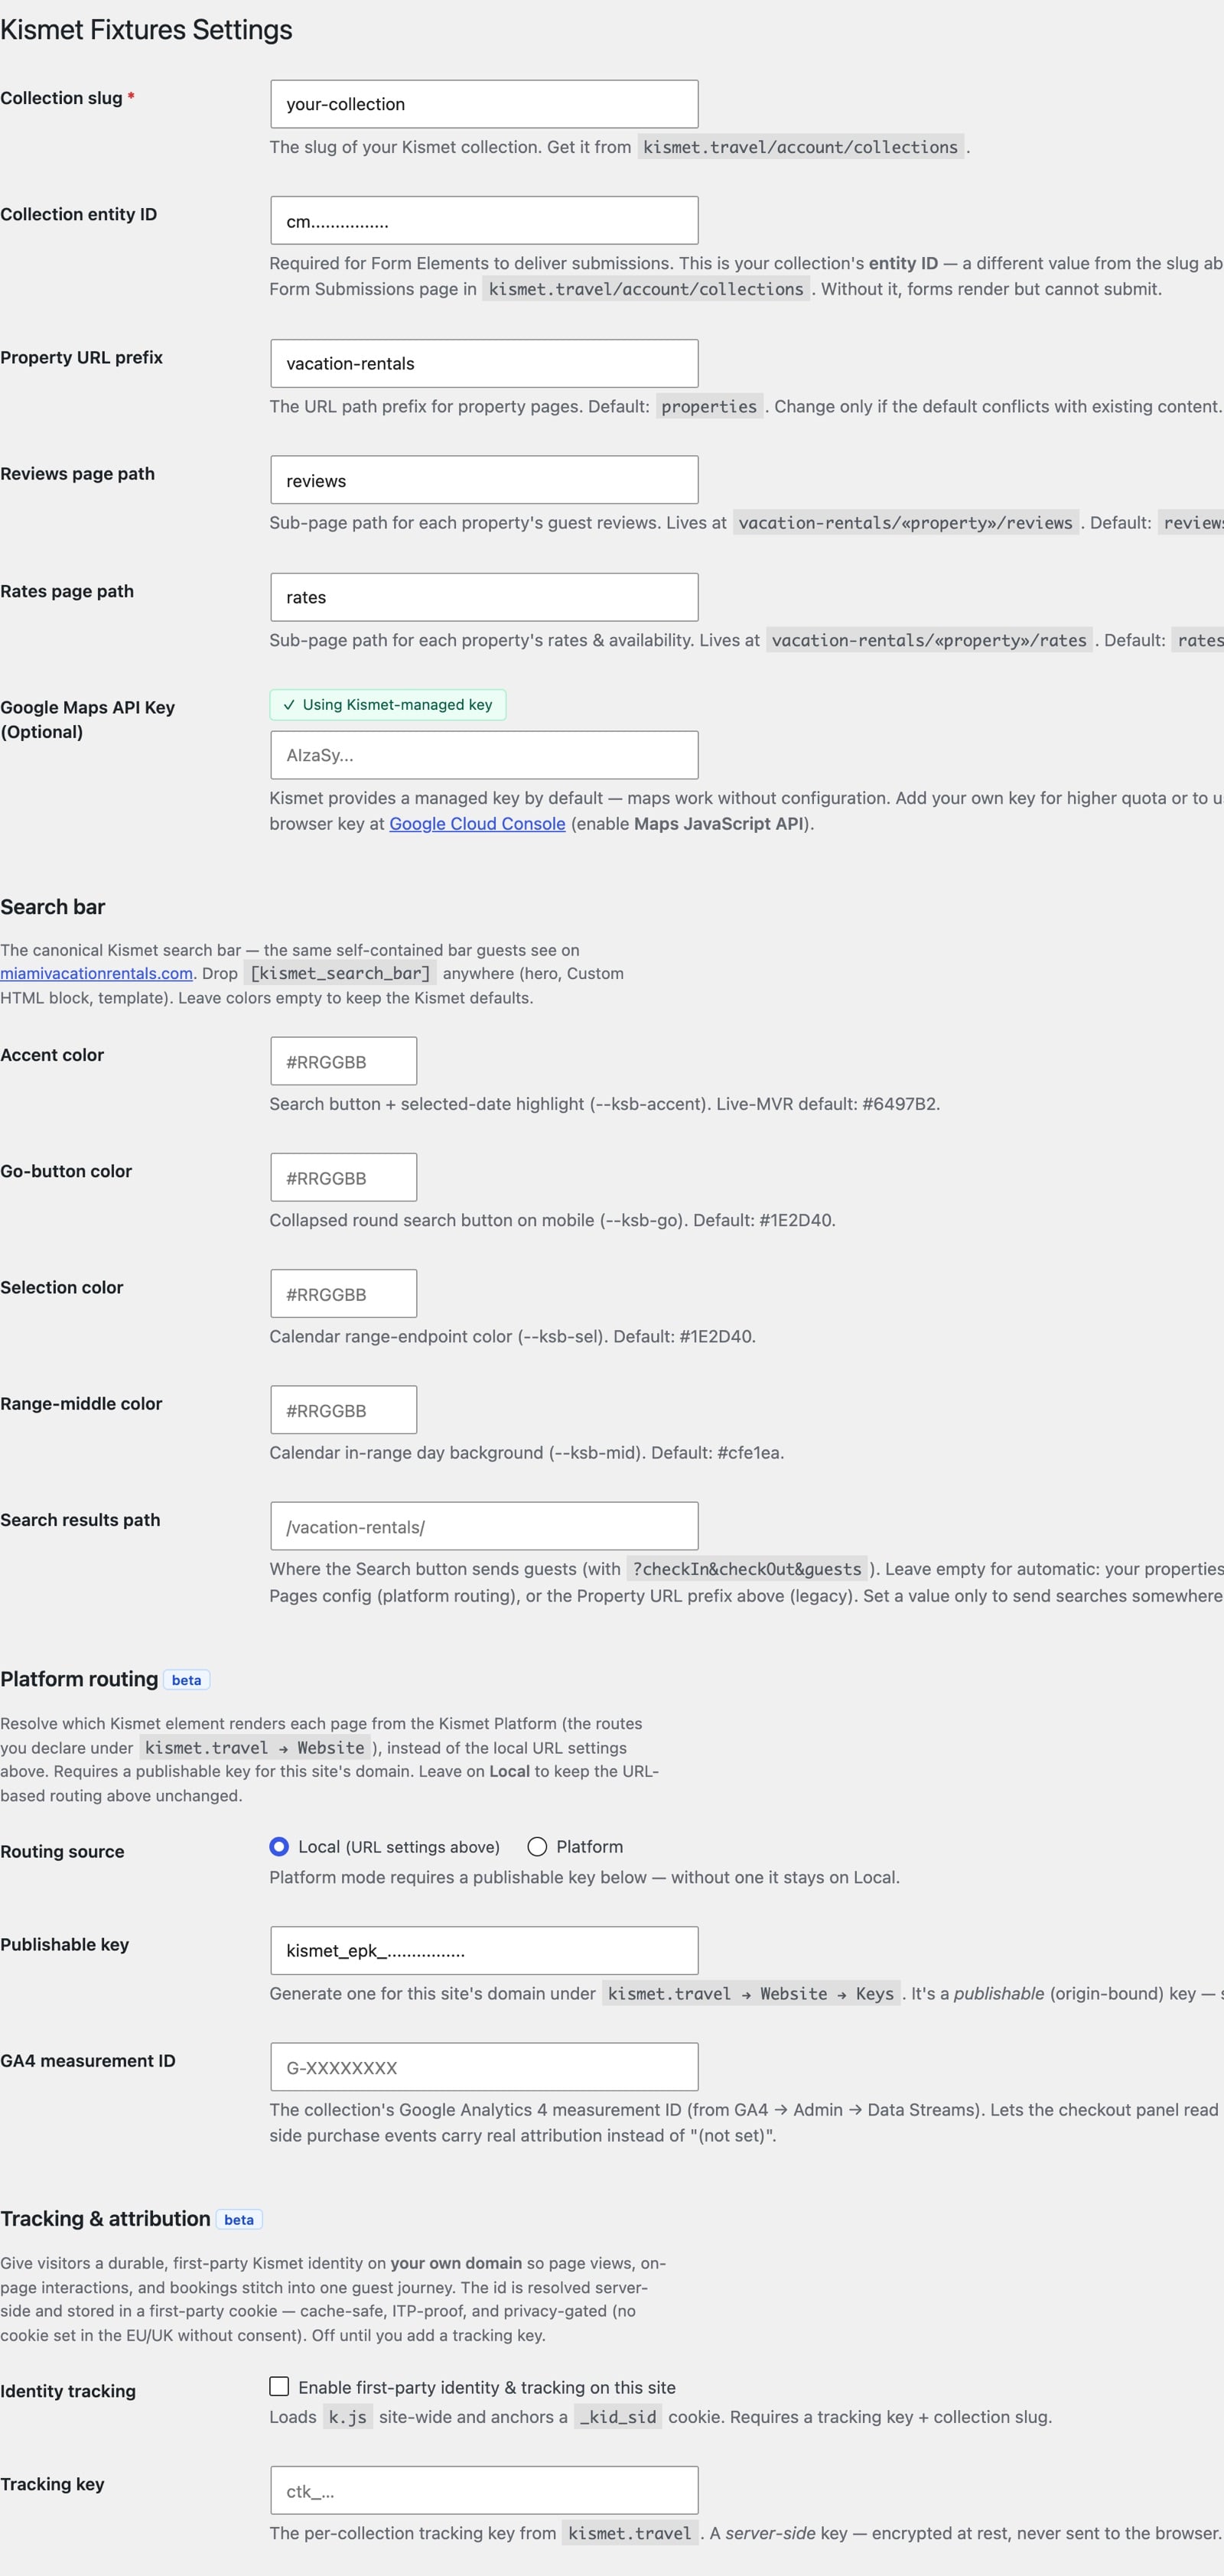
Fill in the fields that apply to every install. The URL fields and the Routing source are decided in step 5.
| Field | Value |
|---|---|
| Collection slug | The manager’s collection slug. Saving it starts the first property sync. |
| Collection entity ID | Only needed for the Form fixture. The manager finds it on the collection’s Form Submissions page in Kismet. |
| Publishable key | The kismet_epk_ key for this hostname. Staging gets the staging key. |
| Identity tracking and Tracking key | Turn tracking on and paste the ctk_ key. This loads Kismet’s tracker site-wide and sets the first-party _kid_sid cookie so a guest’s visit, searches, and booking share one identity. |
| GA4 measurement ID | Optional. Lets the checkout carry the site’s GA4 client and session identifiers into the booking. |
| Google Maps API key | Optional, for the map view. A default key is used if blank. |
Save. Then check two panels on the same screen:
- Sync Status shows the property count after the first sync. Use Sync Properties Now if it has not run.
- Connection Test confirms the site can reach Kismet.
Leave Client ID and Client Secret blank unless Kismet has asked you to use OAuth credentials for a specific feature.
5. Choose how Kismet pages are served
Section titled “5. Choose how Kismet pages are served”This is the one decision in the install. The plugin can work two ways, and the rest of the setup depends on which you pick. The Routing source setting on the screen above is where the choice is recorded: Local for the first, Platform for the second.
| Blocks on your pages | Kismet-served pages | |
|---|---|---|
| Routing source | Local | Platform |
| Who builds the results page | You, as a WordPress page with the results block | The plugin, at the URL declared in Kismet |
| Property pages | Served by the plugin under a URL prefix you set in the plugin | Served by the plugin at the exact URL declared per property in Kismet |
| Group, blog, and policy pages | Not served by the plugin | Served by the plugin at their declared URLs |
| URL declaration in Kismet | Recommended, so canonical URLs and the edge stay in sync | Required before the flip; the plugin creates only declared pages |
| Best for | A site with its own page structure that wants Kismet fixtures inside it | A site that wants Kismet to own the booking pages end to end |
| After every deploy | Nothing extra | Save settings once and purge the cache, or pages 404 until the route map refreshes |
Choose one, follow that page, then come back here for steps 6 and 7. You can move from Local to Platform later; the URL declaration you make for Platform is the same one Local recommends.
6. Verify on staging
Section titled “6. Verify on staging”Purge the host cache, then check each line. Bring this list to the setup call.
- Settings save without an error, Sync Status shows the expected property count, and Connection Test passes.
- The Kismet block category appears in the editor and
[kismet_*]shortcodes render content rather than a configuration notice. - Search from the home page lands on the results page with the dates and guests preserved, and the grid shows real properties with prices for a date range you know is open.
- A property page opens from a result at the URL your setup page defines, and its reviews and rates sub-pages resolve.
- The booking panel opens from the property page and quotes a total. Stop there unless you have agreed a test-booking procedure.
- Server rendering. View the source of the results page and a property page. Both contain
data-kismet-elementmarkers with rendered content inside them and anapplication/ld+jsonscript block; the property page’s block declares anAccommodation. If you only see an empty container, the page came from a cache that predates the plugin. Purge and reload. - Tracking. With tracking on, the page source references
kismet.travel/k.jsand the browser receives a first-party_kid_sidcookie. - Nothing else changed. Your theme, header, footer, and the pages you did not touch look as before. Fixture styles are scoped to Kismet content.
- Performance. Page load on the results page and a property page is at or better than before. Server rendering means the first paint does not wait for JavaScript.
If a fixture renders on the block but not the shortcode, or the reverse, the page is being served by a page builder that strips one of them. Use the other.
7. Go live
Section titled “7. Go live”- Repeat steps 3 and 4 on production with the production publishable key, then the same setup page. Every other setting is the same as staging.
- Save settings once and purge the host cache, so the production route map and rewrite rules are fresh.
- Apply your redirect map: old search and property URLs 301 to the new ones. Agree it with Kismet first; it affects the client’s search rankings and paid landing pages.
- Tell Kismet the site is ready. Kismet adds the edge routes for the client’s domain on a coordinated call. That layer is operated by Kismet and is what records AI crawler visits and attribution on cached pages. Nothing for you to install.
- Run the step 6 checklist on production.
Rollback is deactivating the plugin. The theme, pages, and content are untouched. Kismet removes the edge routes on request. If a plugin update breaks a layout, roll the plugin back to the previous version from your host’s backup and tell Kismet which version.
What to bring to the setup call
Section titled “What to bring to the setup call”- The staging URL, which setup you chose, and confirmation that the step 6 checklist passes.
- The URL map, including redirects from any old pages.
- Which keys were generated and for which hostnames.
- Anything that did not verify, with the page URL.
Common problems
Section titled “Common problems”| Symptom | Cause and fix |
|---|---|
| A configuration notice renders instead of a fixture | No collection slug saved, or the key does not match this hostname. Check Settings, then Connection Test. |
| Results or property pages return 404 after a deploy | Platform routing with a stale route map. Save settings once, purge the host cache, and reload. On WP Engine the edge can pin a 404 for up to ten minutes. |
| Fixtures render but look unstyled | The host cache served HTML from before the plugin was active. Purge and reload. |
| Search returns no properties | The collection has no published properties yet, or the sync has not run. Check Sync Status. |
| The map does not load | Add a Google Maps API key, or check the browser console for a referrer restriction on the key you used. |
| A property page is missing | Platform routing: its URL is not declared in Property URL Mapping, or the URL collided with an existing page. Local routing: the property has not synced. |